Un LISP per stampare un disegno CAD cambiando colori e testi
Nell'articolo ti mostro un LISP che ho scritto per stampare velocemente un file DXF o DWG, ingrandendone alcune scritte, cambiando il colore dei livelli e realizzando un PDF in A3 orientato in base alla maggiore estensione del disegno. Puoi adattarlo facilmente ai tuoi scopi e alla tua stampante/plotter.
L'ho scritto per risparmiarmi molte operazioni ripetitive ogni volta che dovevo stampare un DXF salvato da un software in uso nella mia azienda. Con LISP riesco a ridurre di cinquanta volte tutti i processi, senza errori e riproducendo esattamente i comandi che a volte mi dimentico.
Di solito cambio il DXF esportato da quel software per due ragioni:
- migliorare la stampa e renderla più leggibile;
- avere un PDF con la funzionalità di ricerca testo.
In passato, mi limitavo ad aprire il disegno in CAD e lo stampavo direttamente (al massimo mettevo in tonalità di grigi), come puoi vedere sotto l'output ha bisogno di un po' di lavoro per diventare una stampa decente.
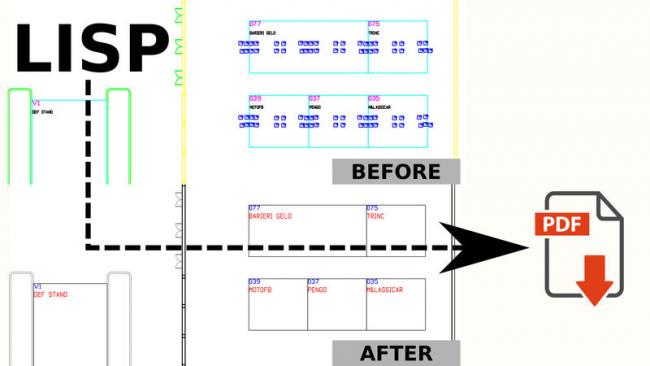
In pratica ogni volta che carico questo tipo di DXF devo:
- ingrandire tutti i testi in un livello (così posso leggerli meglio);
- congelare un layer (inutile e con un pessimo ritorno nelle stampe);
- cambiare il colore di alcuni livelli per adattarli al mio stile di stampa;
- ripristinare il colore dei layer allo stato BYLAYER;
- aggiungere in basso al disegno un testo con il nome del file stesso;
- creare un PDF (assegnando il formato A3, il mio stile di stampa ed il corretto orientamento in funzione dell'estensione del disegno).
Ma ora posso fare tutte queste 6 operazioni scrivendo un solo comando! E questo torna utile soprattutto quando ho 10 o 12 disegni da convertire una o due volte al giorno, mi risparmio compiti estremamente ripetitivi e noiosi.
Per questo prima di postare lo script, ho realizzato un video confronto: nella metà superiore l'esecuzione del LISP e in basso le stesse operazioni fatte da me per lo stesso file. 3 secondi contro 2 minuti e 26 secondi. Quindi il LISP è circa 50 volte più veloce di me!
Puoi copiare il seguente codice LISP e adattarlo come meglio credi. Al momento l'ho chiamato Spazi:
Clicca per vedere il codice
(defun c:Spazi (/ ss TxHt LayName Ent EntData sell n cm)
;; zoom extension
(command "zoom" "E")(princ)

(if
(and
;; For the layer name 7 change the text height to 60
;; SOURCE: https://forums.autodesk.com/t5/visual-lisp-autolisp-and-general/select-objects-based-on-layer-name/m-p/9017917#M389749
(setq LayName "7")
(setq TxHt 60)

(setq ss (ssget "x" (list (cons 0 "TEXT") (cons 8 LayName))))
)
(while (setq Ent (ssname ss 0))
(setq EntData (entget Ent))
(entmod (subst (cons 40 TxHt) (assoc 40 EntData) EntData))
(ssdel Ent ss)
)
)
(print)

(setq sel1 (ssget "_X" '((0 . "*TEXT")(8 . "7"))))
 (if (tblsearch "layer" "(getvar 'LayName)")

(repeat (setq n (sslength sel1));;;count number of entity and go through the each entity
    (print (cdr(assoc 1 (entget (ssname sel1 (setq n (- n 1)))))));;;print text value
    (command "_.chprop" sel1 "" "_color" 1 "");;;change to red color
)
(princ "No entity")
)

;; Change the color of some layers
(command "_.layer" "_color" 10 "0" "")
(command "_.layer" "_color" 4 "2" "")
(command "_.layer" "_color" 1 "3" "")
(command "_.layer" "_color" 2 "4" "")
(command "-layer" "off" 5 "")
(command "_.layer" "_color" 170 "6" "")
(command "_.layer" "_color" 10 "7" "")
(command "_.layer" "_color" 4 "9" "")


;;  taken from ByLayer.lsp [command names: --> BYevery]
;;  To change all properties of objects to BYLAYER and other defaults,
;;  clearing out all entity-specific overrides on such properties.
;;  Works on top-level entities only, not nested ones [e.g. in Blocks].
;;  Kent Cooper, 12 March 2013
;;  SOURCE: https://forums.autodesk.com/t5/visual-lisp-autolisp-and-general/lisp-set-default-color-linetype-line-width-by-layer/m-p/6552240#M344578
  (setq ss (ssget "_X"))
  (repeat (sslength ss)
    (setq
      ent (ssname ss 0)
      edata (entget ent)
      edata (subst '(62 . 256) (assoc 62 edata) edata); color
      edata (subst '(6 . "BYLAYER") (assoc 6 edata) edata); linetype
      edata (subst '(48 . 1.0) (assoc 48 edata) edata); linetype scale
      edata (subst '(370 . -1) (assoc 370 edata) edata); lineweight
      edata (subst '(39 . 0.0) (assoc 39 edata) edata); thickness
    ); setq
    (entmod edata)
    (ssdel ent ss)
  ); repeat

(princ)

;; CreateText is a function to insert a text in a fixed position
;; SOURCE: https://forums.autodesk.com/t5/visual-lisp-autolisp-and-general/trouble-with-text-coordinates/td-p/9313929
(defun CreateText (txtJust txtHeight insertPt txtString)
 (if (= txtJust "tc") (setq horJust 1
                verJust 3))
 (if (= txtJust "mc") (setq horJust 1
                verJust 2))
 (if (= txtJust "bc") (setq horJust 1
                verJust 1))
 (if (= txtJust "ml") (setq horJust 0
                verJust 3))
 (if (= txtJust "mr") (setq horJust 2
                verJust 2))
 (entmake
  (list
   (cons 0 "TEXT")
   (cons 72 horJust) ;Horizontal text justification,0=Left,1=Center,2=Right,4=Center,5=Fit
   (cons 73 verJust) ;Vertical text justification, 0=Baseline,1=Bottom,2=Middle,3=Top
   (cons 10 insertPt)
   (cons 11 insertPt)
   (cons 40 txtHeight)
   (cons 1 txtString)
  )
 )
)
;; Put the filename at the bottom
(CreateText "ml" 250.0 (getvar "EXTMIN") (vl-filename-base (getvar 'DWGNAME)))

;; Check the orientation looking for the extension of the drawing
(setq
  LL (getvar 'extmin)
  UR (getvar 'extmax)
); setq
(if (> (- (car UR) (car LL)) (- (cadr UR) (cadr LL)))
  (princ "Landscape" (setq orientation L))
  (princ "Portrait" (setq orientation V))
); if

;; How to save a PDF file
;; SOURCE: https://www.theswamp.org/index.php?topic=49301.0
(vl-load-com)
    (setq cm (getvar 'CMDECHO))
    (setvar 'CMDECHO 0)
    (if (> (- (car UR) (car LL)) (- (cadr UR) (cadr LL)))
    (command "_.-plot" "_y"
        (if (= 1 (getvar 'TILEMODE)) "Model" (getvar 'CTAB))
        "Print As PDF.pc3" "A3"
        "_I" "_L" "_N" "_E" "_F" "_C" "_Y" "printStyles.ctb" "_Y"
    )
    (command "_.-plot" "_y"
        (if (= 1 (getvar 'TILEMODE)) "Model" (getvar 'CTAB))
        "Print As PDF.pc3" "A3"
        "_I" "_P" "_N" "_E" "_F" "_C" "_Y" "printStyles.ctb" "_Y"
    )
    ); if
    (if (= 1 (getvar 'TILEMODE))
        (command "_A")
        (command "_N" "_Y")
    )
    (command (strcat (getvar 'DWGPREFIX) (vl-filename-base (getvar 'DWGNAME))) "_Y" "_Y")
    (setvar 'CMDECHO cm)
    (princ)

)
Per realizzare il video
Software utilizzato su Windows:
- OBS Studio (https://obsproject.com/) è un programma per registrare lo schermo del proprio PC;
- BricsCAD (https://www.bricsys.com/en-intl/) è un programma CAD;
- Carnac (http://code52.org/carnac/) per mostrare i tasti premuti sullo schermo.
Su Linux:
- Shotcut (https://www.shotcut.org/) è un video-editor usato per tagliare ed aggiungere il temporizzatore nei video;
- Openshot (https://www.openshot.org/) è un altro video-editor usato per aggiungere la siglia 3D iniziale e la pagina con la traccia audio usata;
- FFmpeg (https://ffmpeg.org/) è una suite software completa per registrare, convertire e riprodurre audio e video, la ho usata con questo comando per mettere due video uno sopra l'altro e aggiungere del testo al centro di ognuno di loro
Sources: :
https://stackoverflow.com/questions/11552565/vertically-or-horizontally…
https://ffmpeg.org/ffmpeg-filters.html#drawtextffmpeg -i file1.mp4 -i file2.mp4 -filter_complex \ "[0]drawtext=text='TEXT FILE 1':fontsize=200:x=(w-text_w)/2:y=(h-text_h)/2:[email protected]: box=1: [email protected][v0]; \ [1]drawtext=text='TEXT FILE 2':fontsize=200:x=(w-text_w)/2:y=(h-text_h)/2:[email protected]: box=1: [email protected][v1]; \ [v0][v1]vstack=inputs=2" \ -s 1920x1080 -acodec copy output.mp4
Lo stesso comando ma con l'aggiunta della colonna sonora:ffmpeg -i file1.mp4 -i file2.mp4 -i audio.mp3 -filter_complex "[0]drawtext=text='TEXT FILE 1':fontsize=200:x=(w-text_w)/2:y=(h-text_h)/2:[email protected]: box=1: [email protected][v0]; \ [1]drawtext=text='TEXT FILE 2':fontsize=200:x=(w-text_w)/2:y=(h-text_h)/2:[email protected]: box=1: [email protected][v1]; \ [v0][v1]vstack=inputs=2" -s 1920x1080 -map 2:a -acodec copy output.mp4
Invece ho usato questo comando per velocizzare un video:ffmpeg -i file2.mp4 -vf "setpts=0.25*PTS" -an file2_faster.mp4
Nel video ho utilizzato la seguente musica: Corncob - Country by Kevin MacLeod