Un altro programma per evitare l'affaticamento della vista: Redshift
In Xubuntu 18.04 e derivate ho avuto qualche problema con f.lux, così ho deciso di passare a Redshift. Questi software aggiustano il colore della temperatura dello schermo per ridurre l'affaticamento degli occhi durante l'uso notturno del computer e per non alterare il proprio ritmo circadiano. In questo breve articolo ti mostro come installarlo e configurarlo.
Prima devo ammetterlo mi trovavo bene e usavo f.lux, ma con l'ultimo aggiornamento alla versione 18.04 non hanno fatto il repository e anche installandolo manualmente da GitHub non funziona correttamente, cioè non cambia la temperatura dello schermo.

Installazione
Al contrario Redshift è disponibile tra i pacchetti ufficiali ed è completamente FOSS. Può essere installato usando il Gestore Pacchetti o da un terminale con:
sudo apt install redshift-gtk
Il sorgente è disponibile anche per Windows e MacOS e può essere scaricato da qui. Se preferisci invece avere il binario per una più facile installazione allora ti consiglio di passare a f.lux.
Configurazione
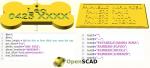
Dopo averlo installato ti consiglio di creare un file di configurazione chiamandolo redshift.conf e posizionandolo nella cartella in $HOME/.config/, ti basta copiare il seguente codice:
[redshift]
; Set the day and night screen temperatures
temp-day=5800
temp-night=4800

; Enable/Disable a smooth transition between day and night
; 0 will cause a direct change from day to night screen temperature.
; 1 will gradually increase or decrease the screen temperature
transition=1

; Set the screen brightness. Default is 1.0
;brightness=0.9
; It is also possible to use different settings for day and night since version 1.8.
;brightness-day=0.7
;brightness-night=0.4
; Set the screen gamma (for all colors, or each color channel individually)
gamma=0.9

;gamma=0.8:0.7:0.8
; Set the location-provider: 'geoclue', 'gnome-clock', 'manual'
; type 'redshift -l list' to see possible values
; The location provider settings are in a different section.
location-provider=manual

; Set the adjustment-method: 'randr', 'vidmode'
; type 'redshift -m list' to see all possible values
; 'randr' is the preferred method, 'vidmode' is an older API
; but works in some cases when 'randr' does not.
; The adjustment method settings are in a different section.
adjustment-method=randr

; Configuration of the location-provider:
; type 'redshift -l PROVIDER:help' to see the settings
; e.g. 'redshift -l manual:help'
[manual]
lat=43
lon=1

; Configuration of the adjustment-method
; type 'redshift -m METHOD:help' to see the settings
; ex: 'redshift -m randr:help'
; In this example, randr is configured to adjust screen 1.
; Note that the numbering starts from 0, so this is actually the second screen.
[randr]
screen=0
Naturalmente dovrai correggere la tua posizione geografica modificando le voci lat= e lon=, se non conosci la tua latitudine e longitudine, puoi scoprirle con Google Maps: una volta trovata la tua posizione, premi il tasto destro del mouse e seleziona "Cosa c'è qui?" nel menu che compare. Poi lo potrai eseguire!
Per maggiori dettagli in basso ho aggiunto una galleria con alcune esaustive immagini.


Aggiungi un commento