How to copy a Drupal website from remote to local
Generally speaking, it is the opposite, because people need to port online their website after creating it in a private environment. But it happened in 2017 and I removed it from my computer after installing a new operating system. Recently I have discovered that the support of my Drupal 8 site will end in November 2, 2021 and I have a lot of incompatibilities with Drupal 9x. So I have to fix them in order to migrate to the new main release of Drupal. This article is born to describe the process that I followed to do the copy of my site and make it run on my computer.
Thanks to some articles, I thought that the migration from version 8 to 9 was easy and painless and furthermore my Altervista hosting is fully compatible with it (PHP Version 7.3.25 and MySQL 8.0.21). So I tried immediately but I received this optimistic message:
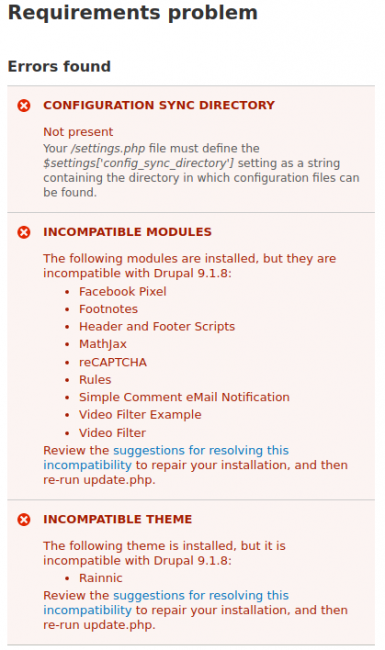
The main problem is my customize theme, because the first two points are easy to fix or in the case of modules to remove. Besides, my theme is old and less responsive. It needs a new layout and a more modern aspect. But I can't write and test a new theme directly on my website, I have first to put it on my local computer and there we are: a new guide to make it possible. I simply reorganized and clean some notes, after having tested them again.

Install a LAMP stack (Apache, PHP, MySQL)
A “LAMP” stack is a group of open-source software that is typically installed together to enable a server to host dynamic websites and web apps. This term is actually an acronym which represents the Linux operating system, with the Apache web server. The site data is stored in a MySQL database, and dynamic content is processed by PHP.
Source: How To Install Linux, Apache, MySQL, PHP (LAMP) stack on Ubuntu 18.04
I followed an Italian guide
# Install Apache2:
~$ sudo apt install apache2
# Make Apache to accept connections on port 80 and 443:
~$ sudo ufw allow in "Apache Full"
# Restart Apache:
~$ sudo service apache2 restart

# Install PHP:
~$ sudo apt install php php-cli libapache2-mod-php php-mysql php-curl php-gd php-mbstring php-xml php-xmlrpc php-soap php-intl php-zip
# Enable modrewrite:
~$ sudo a2enmod rewrite

# Create a directory to store the site:
~$ sudo mkdir -p /var/www/YOURSITENAME/
# Write the configuration for it:
~$ sudo mousepad /etc/apache2/sites-available/YOURSITENAME.conf
# And copy this code inside:
<VirtualHost *:80>
    ServerAdmin [email protected]
    ServerName YOURSITENAME.local
    ServerAlias www.YOURSITENAME.local
    DocumentRoot /var/www/YOURSITENAME
    ErrorLog ${APACHE_LOG_DIR}/error.log
    CustomLog ${APACHE_LOG_DIR}/access.log combined
       <Directory /var/www/YOURSITENAME>
                AllowOverride All
                Order allow,deny
                Allow from all
                # Without this lines mod_rewrite is not work for me
                RewriteEngine on
                RewriteBase /
                RewriteCond %{REQUEST_FILENAME} !-f
                RewriteCond %{REQUEST_FILENAME} !-d
                RewriteRule ^(.*)$ index.php?q=$1 [L,QSA]
                # This is from mod_rewrite manual at this site
       </Directory>
</VirtualHost>

# Enable YOURSITENAME:
~$ sudo a2ensite rainnic.conf
~$ sudo service apache2 restart
~$ sudo apache2ctl configtest
# Remove the warning: 'AH00558: apache2: Could not reliably determine the server's fully qualified domain [...]'
~$ sudo mousepad /etc/hosts
# Insert this code inside:
127.0.0.1    localhost
127.0.0.2    YOURSITENAME.local

# Install MySQL:
~$ sudo apt install mysql-server
~$ mysql
# Enable authentication with password:
mysql> ALTER USER 'root'@'localhost' IDENTIFIED WITH mysql_native_password BY 'YOURPASSWORD';
# To log in mysql:
~$ mysql -u root -p

# Install PhpMyAdmin:
~$ sudo apt install phpmyadmin php-mbstring
~$ sudo phpenmod mbstring
# Add a new user:
mysql> CREATE USER YOURSITENAME@localhost IDENTIFIED BY 'YOURSITENAME';
# Grant permission to your site:
mysql> GRANT ALL PRIVILEGES ON *.* TO 'YOURSITENAME'@'localhost' WITH GRANT OPTION;
mysql> FLUSH PRIVILEGES;
# Try if the following links work:
http://YOURSITENAME
http://YOURSITENAME.local/phpmyadmin
Copy your remote site using an FTP program
Now you have to copy the whole site from remote to local. I suggest first to put your site in maintenance mode and second FileZilla as FTP Client, because it is free and cross-platform. Obviously, you have to upload the root of your site under the folder called: /var/www/YOURSITENAME. And then:
~$ cd /var/www/YOURSITENAME/sites/default
# Edit the settings.php file:
~$ sudo mousepad settings.php
# With:
[...]
$settings['update_free_access'] = TRUE;
[...]
$settings['trusted_host_patterns'] = [
    '^YOURSITENAME\.local$',
    '^www\.YOURSITENAME\.local$',
];
[...]
~$ sudo chown -R $USER:$USER /var/www/YOURSITENAME
~$ sudo chmod -R 755 /var/www/YOURSITENAME
Import the database
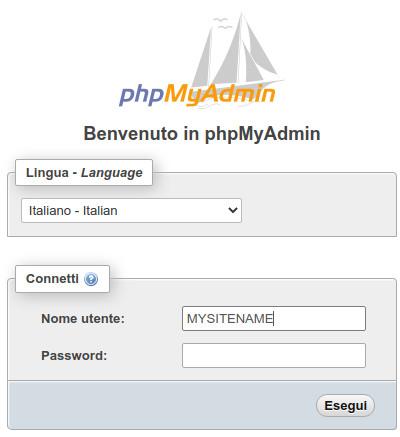
In Altervista the database is called my_YOUSITENAME, so I export it, after logging in Altervista and from the phpMyAdmin version available for my website:

Remember the directory where you store the database.
Copy the database in your local site
In the same directory where you downloaded the SQL file:
mysql> CREATE DATABASE my_YOURSITENAME;
mysql> GRANT SELECT,INSERT,UPDATE,DELETE,CREATE,DROP,INDEX,ALTER,CREATE TEMPORARY TABLES,LOCK TABLES ON my_YOURSITENAME.* TO YOURSITENAME@localhost;
mysql> FLUSH PRIVILEGES;
# Importazione:
mysql> USE my_YOURSITENAME;
mysql> source localhost.sql;
mysql> GRANT SELECT,INSERT,UPDATE,DELETE,CREATE,DROP,INDEX,ALTER,CREATE TEMPORARY TABLES,LOCK TABLES ON my_YOURSITENAME.* TO YOURSITENAME@localhost;
mysql> FLUSH PRIVILEGES;
mysql> exit;
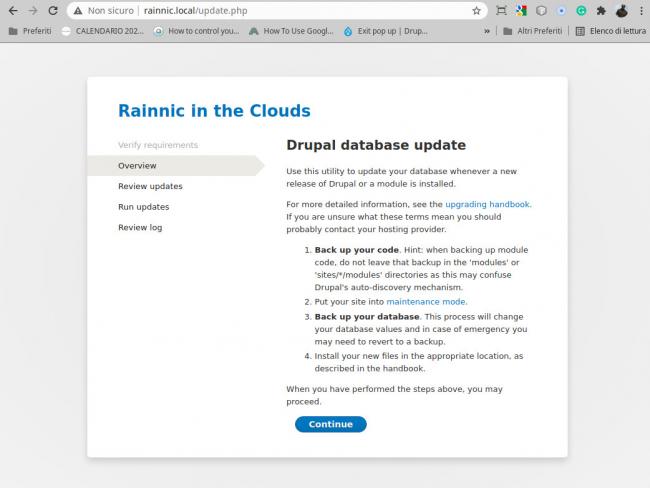
Access to your new local site
Link to http://YOURSITENAME/update.php and then put it online after logging.